Residential Project:
Demolition Plan

For this assignment, I recreated a provided floor plan in ¼” scale utilizing correct line weights. My clients wish to remodel their one- bedroom apartment. They want to open up the small kitchen to the living area to create
a more open-plan environment. Existing appliances will be reused but the cabinetry will be replaced. In
addition, they want the study to become a second bedroom with a closet. All doors will be replaced. All
windows will be replaced with windows the same size currently used. All demolition is shown with a dashed line. I placed the demo plan on a 11"x17" plan sheet. I made sure to include an N arrow and add dimensions of the demolition. I drew this at a 1/4" scale on a sheet of vellum.
*HOVER OVER SITE MENU*

SKETCH-UP ANIMATION
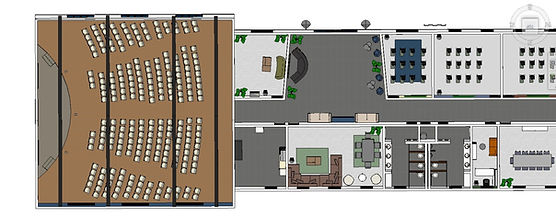
For this project, I uploaded the CAD floor plan onto sketch up and used tools such as push/pull and follow me to build out the model with all of its millwork. I then added finishes such as molding, furniture, textures, colors, and lighting to bring the model to life. In order to envision the space for the customer, I created an animation that walks through the entire church. For this project, I was given complete creative liberty but made sure to incorporate basic design elements such as balance, rhythm, color and etc. I was inspired by my home church, keeping this project close to my heart. I wanted a very calming space with many natural elements such as stone and marble. I was inspired to do exposed beams and a stained glass arch window in the sanctuary to give it a mid-century look. This project allowed me to work on my proficiency in sketch-up by making the chairs in the sanctuary, the stage, the exposed beams, all of the moulding, the doors, and the windows.
PODIUM RENDERED IMAGES


OUTSIDE


RESTROOM


CLASSROOMS + OFFICE


SANCTUARY


COMMON AREAS


LOBBY
REVIT 3D MODEL
Using the same CAD floor plan, I created a Revit model in addition to the Sketch-up model. I decided to keep the layout of the rooms and the millwork the same as they were. The only slight change I made was the style, instead of using stone as accent walls in most of the rooms, I decided to go for wood panel accent walls, also using different colored furniture. I picked out the furniture, fixtures, and equipment by using the family components but also 3rd party websites that allowed me to import components, giving me more options. In order to keep similarity between the two models, I imported the stage and exposed beams from sketch-up onto Revit.


REVIT FLYTHROUGH
For this project, I was introduced to Revit, and in order to practice and advance my skills, I created a semi-similar render of my commercial church project. After I build the 3d model and added furniture, fixtures, and equipment. I made a flythrough through the Revit software using their walkthrough settings. After I exported the video from Revit I did some finishing touches to the video on editing software.
PROJECT SHEETS
One of the final stages of this project was to create sheets in order to show contractors the blueprints of the build in order for everything to run smoothly. I created these sheets in Revit and put all of my information as well as my 'company' logo and the logo of the church. I created a cover page sheet, a level 1 sheet, and a 3d view sheet.


